

How to Manually Upload Bank Transactions into QuickBooks Online
Connecting your bank account directly to QuickBooks Online is usually the easiest way to bring transactions into your books. But sometimes the automatic bank connection doesn't give you everything you need.
Maybe you recently started using QuickBooks and need several months of older transactions. Maybe your bank connection stopped working. Or perhaps your bank simply doesn't connect properly with QuickBooks.
In situations like these, you can manually upload your bank or credit card transactions into QuickBooks Online.
The process itself isn't especially difficult. The more important part is making sure you upload the right transactions into the right account without creating duplicates.
When Would You Need to Upload Transactions Manually?
Manual uploads are especially useful when:
You are setting up QuickBooks for an existing business.
You need transactions from before your bank connection started.
Your bank or credit card account won't connect to QuickBooks.
Your bank connection was interrupted and some transactions are missing.
You are catching up on bookkeeping from previous months.
You have transaction files provided by your bank.
QuickBooks currently allows you to manually upload bank and credit-card activity using transaction files such as QBO, QFX, and CSV files. QuickBooks can also accept certain bank statements in PDF or image format and extract transaction information from them.
Before You Upload Anything, Check Your Dates
This is probably the most important step.
Before downloading transactions from your bank, look at what is already recorded in QuickBooks.
Suppose your QuickBooks bank account already contains transactions beginning on May 1.
If you download and upload transactions beginning on April 1, that's fine because you are filling in the missing period.
But if you accidentally upload May and June again, you may create duplicate transactions that later need to be identified and corrected.
Always determine:
What is the earliest date I actually need?
Then download only the missing period whenever possible.
QuickBooks also recommends reviewing your existing account information before importing transactions specifically to help prevent duplicates.
Step 1: Download the Transactions From Your Bank
Sign in directly to your bank or credit card company's website.
Look for an option such as:
Download transactions
Export
Account activity
Download activity
Transaction history
The exact wording depends on your financial institution.
Choose the bank account or credit card account you want to work with and select the correct date range.
Your bank may give you several download formats.
If a QuickBooks (.QBO) file is available, that is often a convenient choice because it is designed for accounting software.
CSV files are also commonly available and can work well.
Save the downloaded file somewhere easy to find, such as your Downloads folder.
Step 2: Review the File Before Uploading It
Don't automatically upload a file just because it came from the bank.
Open it first and look at it.
You want to make sure:
The dates are correct.
The transaction period is correct.
You downloaded the correct bank account.
Deposits and withdrawals appear properly.
There aren't extra transactions outside the period you need.
This small check can prevent a much bigger cleanup later.
Using a CSV File
CSV files are basically simple spreadsheets containing your bank activity.
QuickBooks can work with a three-column format containing:
Date | Description | Amount
or a four-column format containing:
Date | Description | Credit | Debit
Banks don't all create CSV files the same way, so QuickBooks may ask you to identify which column represents the date, description, money spent, and money received.
For example:
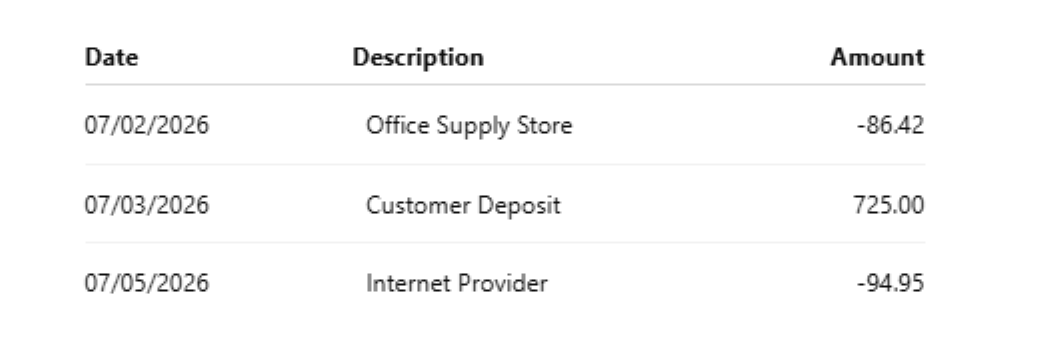
The exact appearance of your bank file may be different.
The goal is simply to make sure QuickBooks understands what each column represents.
Step 3: Go to Bank Transactions in QuickBooks
In QuickBooks Online, go to the area for Bank transactions.
Select the bank or credit card account where these transactions belong.
Then find the option to Upload from file.
Choose the file you downloaded from your bank and continue through the upload process.
QuickBooks will ask which QuickBooks account should receive the transactions.
Pay close attention here.
If you downloaded transactions from your business checking account, choose that checking account.
If you downloaded a business credit card statement, choose the corresponding credit card account.
Uploading transactions into the wrong account can create unnecessary bookkeeping problems.
Step 4: Match the Columns
If you're uploading a CSV file, QuickBooks may ask you to match the columns in your file with the fields QuickBooks needs.
For example:
Your bank's Transaction Date column should be matched with QuickBooks' Date field.
Your bank's Memo or Merchant column may correspond with Description.
Your withdrawal and deposit columns must also be matched correctly.
Take a few seconds to verify the mapping before continuing.
Step 5: Review the Transactions Before Importing
QuickBooks gives you an opportunity to review the transactions before completing the upload.
Use it.
Look especially for:
Incorrect dates
Unexpected transactions
Duplicate transactions
Strange amounts
Transactions outside the period you're working on
If something doesn't look right, it's usually easier to stop and investigate before importing hundreds of transactions.
Uploading Does Not Mean Your Bookkeeping Is Finished
This is one of the biggest misunderstandings about bank transactions in QuickBooks.
Uploading transactions gets the information into QuickBooks.
It doesn't necessarily mean those transactions have been properly recorded.
After the upload, the transactions generally still need to be reviewed.
You may need to tell QuickBooks what each transaction represents.
For example:
A $150 payment might be:
Office supplies
Advertising
Repairs
Inventory
Equipment
A payment to a contractor
An owner's personal purchase
QuickBooks sees the bank transaction.
It doesn't automatically know the business reason behind every purchase.
That's why reviewing transactions is still important.
Be Careful With QuickBooks Suggestions
QuickBooks may suggest categories based on previous transactions, merchant names, bank rules, or other information.
Those suggestions can save time.
But a suggestion is not the same thing as verification.
For example, imagine QuickBooks sees a purchase from Amazon.
It might suggest Office Supplies.
But the purchase could actually have been:
Computer equipment
Cleaning products
Packaging supplies
Inventory
A personal purchase accidentally made with the business card
Look at what was actually purchased before accepting a category.
Watch for Transfers
Transfers are another common source of mistakes.
Suppose you move $2,000 from your business checking account to your business savings account.
Your bank information may show:
Checking account: -$2,000
and
Savings account: +$2,000
The business did not earn $2,000 in new income.
You simply moved money from one business account to another.
If one side is mistakenly categorized as income and the other as an expense, your financial reports can become misleading.
The same idea applies when paying a business credit card from your business checking account.
It is usually a movement of money between accounts—not a new business expense at the time the credit-card payment is made.
Don't Forget About Matching
Sometimes a transaction is already recorded in QuickBooks.
For example, you may have already created an invoice and recorded the customer's payment.
When the bank deposit later appears in your uploaded transactions, you generally don't want to create another sale.
Instead, QuickBooks may allow you to match the bank transaction to the transaction that already exists.
This is another reason you shouldn't automatically click "Add" on every downloaded transaction.
What About Several Years of Missing Transactions?
Manual uploads can be extremely useful during bookkeeping cleanup.
If a business hasn't kept its books updated for a long period, bank and credit-card transaction files can help rebuild the history.
But uploading several years at once can quickly become overwhelming.
A better approach is often to work in smaller periods:
January
then February
then March
and so on.
Or work one quarter at a time.
Smaller batches make it easier to find mistakes and determine where something went wrong.
Keep the Original Bank Statements
Even after transactions are successfully uploaded, keep your original bank and credit-card statements.
The transaction feed inside QuickBooks should not be your only record.
Statements are useful when:
Reconciling the account
Investigating missing transactions
Finding duplicate entries
Confirming beginning and ending balances
Reviewing older bookkeeping
Supporting information provided to your accountant or tax professional
The Final Step: Reconcile the Account
Once your transactions have been uploaded, reviewed, matched, and categorized, there is still one important step left:
Reconciliation.
Reconciliation compares the records in QuickBooks with the actual bank or credit-card statement.
For example, if your June bank statement says the ending balance was $18,462.75, your reconciled QuickBooks records should agree with that statement after the appropriate transactions are accounted for.
If they don't agree, something may be missing, duplicated, recorded incorrectly, or entered on the wrong date.
QuickBooks specifically recommends categorizing or matching uploaded transactions and then reconciling the account afterward.
A Simple Rule to Remember
Think of manual transaction uploading as three separate jobs:
1. Upload the transactions.
Get the missing bank activity into QuickBooks.
2. Review the transactions.
Determine what each transaction actually represents and match transactions that are already recorded.
3. Reconcile the account.
Confirm that your QuickBooks records agree with the actual bank statement.
Uploading alone is not bookkeeping.
The review and reconciliation are what help turn a list of bank transactions into reliable financial records.
Final Thoughts
Manual uploads are a valuable QuickBooks tool, especially when you're catching up on older bookkeeping or dealing with a bank connection that isn't working properly.
The technical part—selecting a file and uploading it—is usually straightforward.
The part that requires more attention is deciding what should be uploaded, preventing duplicates, correctly handling transfers and matches, and making sure the final records agree with the bank statement.
Taking a few extra minutes to review the transactions before and after importing them can save hours of cleanup later.
